If you’re looking for a way to achieve perfectly shaped, full brows without heading to a salon, learning how to do brow lamination at home is the perfect solution. This DIY brow treatment can give you sleek, natural-looking brows that last for weeks.
In this guide, we’ll walk you through everything you need to know about brow lamination, from the essential tools to the step-by-step process.
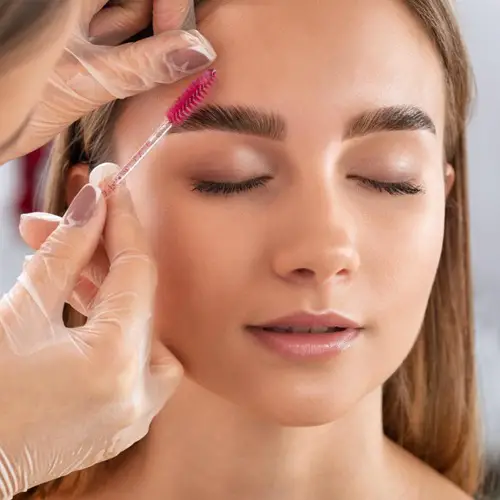
How to Do Brow Lamination at Home?
If you’re ready to try DIY brow lamination, follow these steps carefully to achieve beautiful results.
1) Gather Your Supplies
Before you begin, make sure you have all the necessary items to make the process smooth and effective. Here’s what you’ll need:
- Brow Lamination Kit: These kits typically include a perming solution, a setting solution, and a nourishing serum.
- Gentle Cleanser: This is used to clean your brow area.
- Cotton Pads and Q-Tips: For applying and removing solutions.
- Spoolie or Brow Brush: To comb and shape your brows.
- Plastic Wrap: To cover your brows while the solutions are set.
- Small Bowl: This is used to mix the solutions if needed.
It is essential to use a high-quality brow lamination kit from a reputable brand. Make sure the ingredients are safe for your skin type, especially if you have sensitive skin.
2) Clean and Prep Your Brows
Start by thoroughly cleaning your brows. Use a gentle, non-oily cleanser to remove all makeup, dirt, and oils from the brow area, as these can prevent the solutions from working effectively.
Once your brows are clean, dry them completely, ensuring no moisture remains on the skin. Use your spoolie to comb through your brows, lifting and shaping them in the direction you’d like. Trimming any extra-long brow hairs can also help create a neat, finished look.
Related:
- Can You Do Brow Lamination While Pregnant?
- How Long After Brow Lamination Can I Wear Makeup?
- How to Fix Over-Processed Brow Lamination?
3) Apply the Perming Solution
Now, it’s time for the perming solution, which softens the brow hairs, making them moldable.
- Dip a Q-tip or applicator brush into the perming solution, taking a small amount to avoid overuse.
- Carefully apply the solution to your brows, ensuring every hair is coated without soaking them.
- Use your spoolie to comb your brow hairs upward and into the shape you desire.
- Cover your brows with a small piece of plastic wrap to hold them in place and allow the solution to set for about 8 to 10 minutes (follow the instructions specific to your kit).
After the time is up, gently remove the plastic wrap and wipe away the perming solution with a cotton pad. Be sure to handle your brows delicately, as they will be softer at this stage.
4) Apply the Setting Solution
The setting solution locks your brow hairs into the newly shaped, lifted look, giving you that full, defined effect.
- Using a clean Q-tip or brush, apply the setting solution over your brows.
- Comb through your brows again to shape them in your desired direction, lifting the hairs upward for that fluffy, laminated look.
- According to your kit’s instructions, leave the setting solution on for another 5 to 10 minutes.
After the time has passed, gently remove the setting solution using a cotton pad. The setting solution will harden the shape of your brows, giving you long-lasting results.
5) Finish with a Nourishing Serum
Since the perming and setting solutions can be slightly drying, nourishing your brows afterward is crucial.
Apply a nourishing serum from your kit, or use a natural oil like castor oil or coconut oil. Gently massage it into your brows to restore moisture. This will keep your brow hairs soft, hydrated, and healthy-looking. This final step completes the lamination process and helps your brows look shiny and well-groomed.
Must Read:
- What to Do After Brow Lamination?
- Can You Shower After Brow Lamination?
- Can You Workout After Brow Lamination?
Why Do Brow Lamination at Home? The Benefits Explained?
Doing brow lamination at home has several benefits:
- Cost-Effective: Brow lamination at a salon can be expensive, while DIY kits are budget-friendly, especially if you plan to do it regularly.
- Convenience: You can laminate your brows whenever they fit your schedule without waiting for appointments.
- Personal Style Control: When you do it yourself, you have complete control over the shape, arch, and fullness, allowing you to achieve a style that suits your face.
How Long Do Laminated Brows Last?
Brow lamination typically lasts 6 to 8 weeks, depending on hair growth and aftercare. With proper care, you may enjoy the results for up to two months. It’s a great solution for beautiful brows that stay in place for weeks.
Essential Aftercare Tips for Long-Lasting Results
After lamination, taking care of your brows is crucial to maintain the fluffy, lifted look. Here’s how:
- Avoid Water and Makeup for 24 Hours: This allows the solutions to be set fully, preventing any premature breakdown of the lamination effect.
- Moisturize Regularly: Use the nourishing serum from your kit or apply a natural oil to keep your brows hydrated.
- Avoid Excessive Touching: Try not to touch or rub your brows too much, as this can shift hairs and alter their shape.
- Be Gentle with Skin Products: Avoid harsh products like exfoliants or strong skincare acids around your brows for at least a week, as these can weaken the lamination results.
These aftercare tips will help your laminated brows last. They’ll keep them fresh and full.
Popular:
- Can You Shower After Brow Lamination?
- Can You Get Brow Lamination While Pregnant?
- How to Care for Tape-In Hair Extensions?
Common Mistakes to Avoid When Laminating Your Brows
When attempting brow lamination at home, avoid these common pitfalls to ensure the best results:
- Skipping the Patch Test: This is important, especially if you have sensitive skin. Always do a patch test to avoid potential allergic reactions.
- Leaving Solutions on Too Long: Over-processing can damage your brow hairs. Stick to the recommended time for each solution.
- Using Too Much Product: A small amount of solution goes a long way. Applying too much can make your brows feel stiff or crunchy.
- Neglecting Aftercare: Proper aftercare ensures that your brow lamination lasts. Failing to moisturize or protect your brows can lead to dryness or breakage.
Avoiding these mistakes will make your brow lamination more successful and long-lasting.
Trending:
- How to Take Care of Straightened Hair?
- How to Diffuse Wavy Hair Without a Diffuser?
- How to Use Leave-In Conditioner for Wavy Hair?
Pros and Cons of Brow Lamination at Home
While DIY brow lamination has many advantages, it’s essential to consider both sides:
Pros
- Cost-saving: Kits are affordable and offer multiple uses.
- Convenience: No appointments, just a quick treatment at home.
- Control: Full control over the shape and style of your brows.
Cons
- Risk of Skin Irritation: Perming solutions can irritate sensitive skin.
- Requires Practice: Achieving a professional look may take a few tries.
- Maintenance: Regular aftercare is essential to keep brows looking good.
By weighing these pros and cons, you can decide if DIY brow lamination is the best choice for you.
Frequently Asked Questions About Brow Lamination
To help you get started confidently, here are some frequently asked questions about brow lamination:
1) Is brow lamination safe to do at home?
Yes, if done correctly and with the right products, brow lamination can be safe at home. Always perform a patch test and follow the instructions on your kit to avoid skin irritation.
2) How long does DIY brow lamination take?
The entire process, including cleaning, applying solutions, and aftercare, usually takes about 30-45 minutes.
3) What should I avoid after doing brow lamination?
Avoid water, makeup, and harsh skincare products around the brow area for at least 24 hours to let the lamination fully set.
4) How often can I laminate my brows?
It’s recommended to wait at least 6-8 weeks between laminations to avoid over-processing and potential damage to brow hairs.
5) Can I use any perming solution for brow lamination?
No, it’s best to use a brow-specific lamination kit. General perming solutions might be too harsh for facial skin and brow hair.
6) Will brow lamination work on all hair types?
Brow lamination works best on medium to full brows. If your brows are very thin, the results might be subtle.
7) Is brow lamination the same as microblading?
No, brow lamination shapes and lifts existing brow hairs, while microblading adds pigment to create the appearance of fuller brows.
8) Can I do brow lamination if I have sensitive skin?
If you have sensitive skin, consult your dermatologist first, and always do a patch test. Some solutions may irritate sensitive skin.
9) How can I maintain the laminated brow look longer?
Use a nourishing serum or natural oil, avoid excessive touching, and follow proper aftercare to keep the laminated look for up to 8 weeks.
10) What should I do if I accidentally over-process my brows?
If you notice dryness or damage, avoid re-laminating too soon, apply a nourishing oil daily, and let your brows rest until they regain their natural texture.
Conclusion
Brow lamination at home is a great way to get salon-quality brows. It avoids the high cost and the hassle of scheduling appointments. With this step-by-step guide, you’re now equipped with all the knowledge to safely and effectively style your brows at home. To get the best results, follow each step. Practice good aftercare. Avoid common mistakes. Laminated brows can enhance your look. They boost your confidence and speed up your makeup routine. So, go ahead, give brow lamination a try, and enjoy your new, beautiful brows!
Leave a Reply